Installing Apache 2.2.4 in UNIX

You can carry out a basic standalone installation of Apache 2.2.4 on UNIX using the below mentioned steps. Required steps are written and can be understood easily.

The below steps are taken from official Apache Org site.

Step 1) Getting the Apache 2.2.4 dumps

You can get the software dump for Apache from official Apache.org site. You can download the required dump from this page.

Step 2) Once you get the dump, it will be in the form of zip file (.gz). You can unzip the file dump using following command

gunzip httpd-2.2.4.tar.gz

After this you will get a .tar file. You need to extract this and get all the required files. You can do the same using following command

tar -xvf httpd-2.2.4.tar

Step 3) Once you extract all the files, next you need to configure the source tree.This is done using the script configure included in the root directory of the dump.

To configure the source tree using all the default options, simply type ./configure. To change the default options, configure accepts a variety of variables and command line options.

The most important option is the location –prefix where the Apache HTTP Server is to be installed later, because Apache HTTPd has to be configured for this location to work correctly. More fine-tuned control of the location of files is possible with additional configure options.

Use the below step to configure Apache source tree. To run the below command you have to be in the dump directory of apache.

./configure –prefix=/u01/app/oracle/product/apache –enable-rewrite=shared –enable-speling=shared

Step 4) Build

Now you can build the various parts which form the Apache HTTPd package by simply running the command:

Below command also needs to be run from dump directory.

[oracle@ocvmrh2023 httpd-2.2.4]$ make

Step 5) Now it’s time to install the package under the configured installation directory by running:

[oracle@ocvmrh2023 httpd-2.2.4]$ make install

Step 6) configure Apache.

We can do the simple configuration by just setting the correct port number. By default it will have port 80. You need to set some other port, which is unused. For my installation I am setting the port 7771. The port number is to be set in httpd.conf file in [APAHCE_HOME dir]/conf directory.

Once you do that bounce the apache using following command. The below script is present in [APACHE_HOME dir]/bin

[oracle@ocvmrh2023 bin]$ ./apachectl stop
httpd (no pid file) not running
[oracle@ocvmrh2023 bin]$ ./apachectl start
[oracle@ocvmrh2023 bin]$

You can confirm the installation by accessing the server using the below URL

http://(hostname : port)/

In my case it will be

http://ocvmrh2023.us.oracle.com:7771/

You can see a text “It works!“. This confirms that your apache installation went fine.
Upgrading database to 10.2.0.2.0

Introduction and scope:

This document is intended for those which are having 10.2.0.1 database installation and intended to upgrade the same to 10.2.0.2, by applying 10.2.0.2 patchset.

This document is based on Metalink note ID 316900.1. Follow the below procedure for upgrading the database from 10.2.0.1 to 10.2.0.2

Pre-Requiste:

We are assuming that you have already installed 10.2.0.1 Database. This patchset has to be applied over and above 10.2.0.1.

Pre Installation Steps:

  1. Download patch p4547817_10202_LINUX.zip (download patch according to your operating system like windows, solaris..) and copy it to your linux machine
  2. Unzip patch as “unzip p4547817_10202_LINUX.zip”
  3. Set ORACLE_HOME and ORACLE_SID to your database (10.2.0.1) on which you are planning to apply this patchset .
    • ORACLE_HOME = /u01/app/oracle/OHome
    • ORACLE_SID = g9
    • export ORACLE_HOME ORACLE_SID
  4. Stop database and database listener
  5. Take a cold backup of your complete database.

Database 10.2.0.2 Patch Set Installation Steps:

Login as oracle user who installed 10.2.0.1 database make sure that DISPLAY variable is set correctly and check xclock command is opening a clock. Change directory to patchset unziped directory and run the following command

bash-2.05$ ./runInstaller -invPtrLoc /u01/app/oracle/OHome/oraInst.Loc

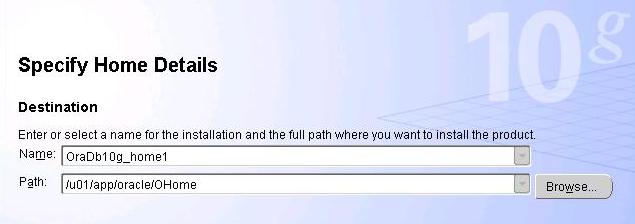
untitled.jpg

Choose the correct ORACLE_HOME name and location. Remember that you are upgrading the existing 10.2.0.1 ORACLE_HOME.

Other screens are simple and self explanatory.

Check opatch version after ORACLE_HOME is upgraded.

bash-2.05$ cd $ORACLE_HOME
bash-2.05$ cd OPatch/
bash-2.05$ opatch version

Invoking OPatch 10.2.0.2.0

OPatch Version: 10.2.0.2.0

OPatch succeeded.

Now we have upgraded the ORACLE_HOME to 10.2.0.2. Next thing is to upgrade the database from 10.2.0.1 to 10.2.0.2. For this you need to open the database in upgrade.

  1. Mount the database and check the parameters first and check the parameters SHARED_POOL_SIZE and JAVA_POOL_SIZE. Values for these parameters should be atleast 150M. If not please set the values to atleast 150M.
  2. shutdown and startup again in upgrade mode.

SQL> startup upgrade
ORACLE instance started.

Total System Global Area 427819008 bytes
Fixed Size 2029464 bytes
Variable Size 398461032 bytes
Database Buffers 25165824 bytes
Redo Buffers 2162688 bytes
Database mounted.
Database opened.

SQL> spool upgrade.log
SQL> @?/rdbms/admin/catupgrd.sql

untitled2.jpg

SQL> spool off

Once the upgrade is done. Check any errors in the spooled file. If every thing is OK you can proceed to recompile the invalids using utlrp.sql script present in ORACLE_HOME/rdbms/admin directory.

After recompiling shutdown the database and startup for allowing access to the users.

Renaming a tablespace – Oracle database 9i and 10g

Oracle 9i:

SQL> CREATE TABLESPACE test1 DATAFILE ‘/u01/app/orsbox/proddata/test1.dbf’ size 500M EXTENT MANAGEMENT LOCAL SEGMENT SPACE MANAGEMENT AUTO;

Tablespace created.

For Renaming the tablespace, we don’t have a direct command in 9i. For that we need to follow the below steps.

1) Export all of the objects from the tablespace

[orsbox@ocvmrh2124 9.2.0]$ exp system/manager FILE=test1.dmp LOG=test1.log TABLESPACES=test1

Export: Release 9.2.0.3.0 – Production on Thu Jul 12 01:02:37 2007

Copyright (c) 1982, 2002, Oracle Corporation. All rights reserved.

Connected to: Oracle9i Enterprise Edition Release 9.2.0.3.0 – Production
With the Partitioning, OLAP and Oracle Data Mining options
JServer Release 9.2.0.3.0 – Production
Export done in US7ASCII character set and AL16UTF16 NCHAR character set

About to export selected tablespaces …
For tablespace TEST1 …
. exporting cluster definitions
. exporting table definitions
. exporting referential integrity constraints
. exporting triggers
Export terminated successfully without warnings.

2) Drop the tablespace including contents

SQL> drop tablespace test1 including contents;

Tablespace dropped.

3) Recreate the tablespace

SQL> CREATE TABLESPACE test2 DATAFILE ‘/u01/app/orsbox/proddata/test1.dbf’ size 500M REUSE EXTENT MANAGEMENT LOCAL SEGMENT SPACE MANAGEMENT AUTO;

Tablespace created.

4) Import the objects

[orsbox@ocvmrh2124 9.2.0]$ imp system/manager FILE=test1.dmp LOG=test1.log FULL=Y TABLESPACES=test2

Import: Release 9.2.0.3.0 – Production on Thu Jul 12 01:27:47 2007

Copyright (c) 1982, 2002, Oracle Corporation. All rights reserved.

Connected to: Oracle9i Enterprise Edition Release 9.2.0.3.0 – Production
With the Partitioning, OLAP and Oracle Data Mining options
JServer Release 9.2.0.3.0 – Production

Export file created by EXPORT:V09.02.00 via conventional path
import done in US7ASCII character set and AL16UTF16 NCHAR character set
. importing SYSTEM’s objects into SYSTEM
Import terminated successfully without warnings.

[orsbox@ocvmrh2124 9.2.0]$

Oracle Database 10g:

In Oracle database 10g we can easily rename a tablespace. Renaming of tablespace has been simplified to an extent of a single ALTER TABLESPACE command. Lets see how renaming of tablespace can be done in 10g.

SQL> CREATE TABLESPACE test1 DATAFILE ‘/slot/ems1177/oracle/db/apps_st/data/test1.dbf’ size 500M EXTENT MANAGEMENT LOCAL SEGMENT SPACE MANAGEMENT AUTO;

Tablespace created.

SQL> alter tablespace test1 rename to test2;

Tablespace altered.